skip to main |
skip to sidebar
Hmmm, what more can we create together with all things SEI? Well, I had never tried a page kit before and wanted to see if I would like the concept.

I loved it! Every single sheet of patterned paper, ribbon, die cuts and embellishments used on these layouts today were included in the kit. I didn’t add anything extra to complete these scrapbook pages.
Here is the instruction sheet that comes in kit so that you’ll see that I followed the sketches pretty closely, with just a few variations.

I don’t usually use sketches, but felt very comfortable using the suggestions of the SEI designers. Wow, it’s all there, including labels on the backs of all the papers and die cuts so that I knew exactly where to place each item.
Here are my first two layouts:

Since the “best friends” die cut was originally in pink, I used my brown marker and wrote over the words to better coordinate with the page {especially since my son was in the photo!} I felt okay using a floral pattern on this page since Zach’s girlfriend was in the photo and with the brown and green, it didn’t feel overly girly. I roughly sewed the brown ribbon included with the kit and purposely frayed the edges. I loosely interpreted the sketch due to my photo being a 6x4 rather than a 4x6 as in the sketch.


For my son’s Prom layout, I changed the placement of the ribbon from vertical to horizontal and used it to thread through the “happy memories” die cut.

And boy did I put those stickers to good use. The two green journaling spots on the right hand side were once one sticker, which I trimmed. I did the same thing to the brown journaling spots at the top and bottom of the layout. The extra piece of the brown-edged journaling spot was used as a tab in the upper left-hand corner of the layout.

The glittery curved stickers are what was left on the sticker sheet when I removed the journaling spots. I trimmed them and adhered them to my page.
And my next two layouts:

My oldest daughter loves all things pink and girly and so does her school friend, making this patterned paper a perfect match! I changed the orientation of one of the photos and fussy cut around some stickers, which I adhered with pop dots for dimension, but the feel pretty closely matches the original.

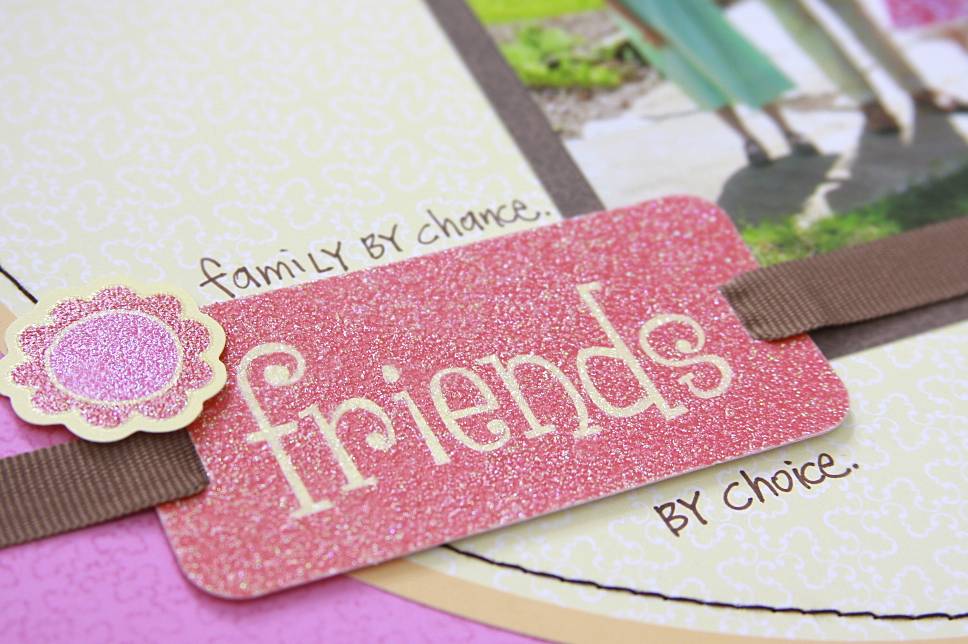
With my next layout, I used the die cut “friends” tag as part of my title. Again, I fussy cut around some of the stickers and added them to the page with pop dots. I like that the sewn borders around the page and the circle dies are anything but perfect. This just might be my favorite layout of the four. As a matter of fact, I might even scraplift it and make the same page for each of the kids’ albums!


Can you believe it, there were extra embellishments left after making four complete layouts. I challenged myself to use every last bit of the kit, and I did. Want to know what I created with all the awesome extra bits? SEVEN greeting cards! And if you’re wondering where that yellow patterned paper came from, I cut it from behind the brown paper of the first layout I shared with you. Why waste that pretty paper behind another piece of paper...put it to good use!

Thank you for allowing me to guest blog with you at SEI LIfestyles this week, I appreciate your kind comments and I thoroughly enjoyed crafting with you. If you’d like to see more of my projects, tutorials and downloads, I invite you to browse my blog, www.iloveitallwithmonikawright.blogspot.com anytime.
W
ahoo! We love how smart Monika is about using scraps and pieces. It was pretty neat to see how she adapted the page kit to fit her style and photos.
Wasn't it a great week? We can hardly believe how many great projects she came up with in such a short time. Don't forget, if you want to see more of Monika's creations, stop by her blog, i love it all. Thanks a million, Monika!
You can play with this page kit too. In fact, one lucky person will win it and some of the other goodies Monika used this week. To enter, leave a comment on this post telling us which post was your favorite this week by Sunday, August 22nd at midnight MST. We will announce the winner Monday. Be sure to check back to see if you are the winner because if we don't hear from the winner within a week we will pick a new one.
This giveaway is now closed but feel free to continue to leave comments for Monika.
It’s already back-to-school time here in East Tennessee, my daughter is already in her 3rd week of classes. We’ve had her ready-to-go for weeks. My youngest daughter is still at home, she missed the Kindergarten cut-off by 6 weeks. That means we have another year of what we call “Mommy School.” Even so, I made her the same items I made for her older sister.

To decorate back packs, or a Library Day book bag as I did for Victoria, look for the self-adhesive luggage tags available almost everywhere.

Using your favorite patterned paper collection, I used the Happy Day paper pad and Glitter Sprinkles, embellish your tag. I decided upon a paper strip at the top of the tag. After I punched a flower shape and backed it with a scrap, I turned it over and covered that scrap paper that was covering the punched flower shape with a Glitter Sprinkle.
 {It does have a phone number, I just blurred it for privacy.}
You’ve all heard of lunchbox notes, I’m sure.

My daughter eats at school, so I made her some “backpack” notes, instead. The coupon tucked inside Isabella’s backpack last week said, “Good luck on your test. You’re always a superstar to us.” That note had a star shape punched out.

This note for Victoria will award her a special treat of a Cherry Limeade from Sonic. We’ve begun work on her sight words and she’s doing so well!

If you guessed that this as an upcycled mint tin, you’re right. Go ahead, look for your empty tin now, I’ll be waiting when you get back. With a little measuring, a little trimming and a little embellishing, you will have created an adorable place to stash notes of encouragement and love.
Here’s a look at the inside of the tin. Oh, and the back has a piece of patterned paper to cover what’s printed there.

And just because I couldn’t stop there, I’ve embellished a hair clip that had lost it’s adornment. Again, I used the double-sided flowers that I showed you in Monday’s post and some rhinestones from the Jocelyn collection beaded frill and a mixture of Happy Day and Jocelyn papers to make this hair clip fit for a 2nd grade princess!

Tomorrow is my last day, but no fear...I have 4 layouts to share with you!
Let’s all say it together...I love mini-albums! There, doesn’t that feel better?
This post is packed with 3 mini-albums and a bonus project, too, so let’s get this Wacky Wednesday started.
I’m going to start off with a 4x4 mini I made for my youngest daughter. As I was getting ready to photograph the album, she sat down and started looking through it. Half way through, she excitedly said, “It’s all about me!” A girl after her scrapbooking Mommy’s heart.

I embellished my front cover, which is painted canvas with a “just be you” rub-on from the Jocelyn collection, which I cut it down to a different configuration to fit the cover. The starburst swirl is part of the beaded frill also from the Jocelyn collection. I used my Crop-o-Dile to insert a grommet through which I strung my beaded chain, my Victoria hang tag, and some SEI ribbons.

Her nickname is Spunky, if that tells you anything and I used that description as my starting point, choosing a different characteristic of hers for each page. All but one of the pages came from the Jocelyn collection 6x6 paper pad. For the inside front cover, I used paper strips left over from cutting the 6x6 papers down to 4x4 to make my own pattern of SEI papers!
Here are a few more pages:


For this mini-album, I trimmed down some notebook paper to 6x6 and rounded the two outside corners. Here comes the fun part...using your favorite 6x6 paper pad, I used the Jocelyn collection again, choose two coordinating prints. Adhere the papers back to back.

Choose a rub-on image and adhere to a sturdy piece of cardstock, then trim around the image. Using a punch, punch a hole in what will be your front cover so that you can thread your SEI ribbon through. Before threading through the next hole, attach another punched piece of cardstock to the inside front cover before threading through the next hole, ending up back on the front cover. Tie a knot in your ribbon, adding the cut out rub-on image as an embellishment.

Now choose two other patterned papers from the 6x6 paper pad and added a punched tab to the top of each paper. These will be your sections.

I plan to use my mini-album journal for all of the sign-ons, passwords and other technical info I need to keep handy now that I am blogging. I already have a notebook that I’ve been using, but recently came to the realization that I shouldn’t give away all the stuff I make, I deserve some pretty things, too. So, I challenge you to do something nice for yourself today. Go ahead, just do it!

Hmmm.... Are you wondering what this 6x6 mini-album could be? The cover probably gives it away, but I’ll tell you anyway. It’s an address book.

My handwriting is not very dainty at all, so I made sure when I designed this address page that there was plenty of room to write all your information. I even included room for an e-mail address and a cell phone number. Oh, and the left margin is wide enough to use your Bind-it-All, binder rings, ball chain or ribbon to keep it all together. You could even punch holes and add it to a 6x6 scrapbook album.

Now, you’ll want two pieces of patterned paper approximately 5.25” long and 2.75” wide. Additionally, you’ll need a piece of coordinating paper measuring approximately 3.50” long, which you’ll fold in half. I used a punch to embellish the edges of this piece. Adhere the two long pieces to the one shorter piece to make a cover for your note pad.
Take 2.75” x 11” long strips of paper and fold in half. Using your 1/8” hole punch, punch two holes through the paper and the cover. I used embroidery floss and sewed through the holes several times to bind the pages and the cover together. Choose your favorite Glitter Sprinkles die cut accent and, using a pop dot, adhere it to the front of your note pad.

There’s no excuse for us not to be organized this school year, is there? Speaking of school, are you up for a few back-to-school projects tomorrow? I hope the answer is yes...yes...yes, Monika, we are!
NOTE:
If any of you are interested in having the address book pages as download, leave a comment on the SEI Lifestyles blog. If there’s enough interest, I’ll do a post and offer the free download on my blog, i love it all, next week.
Oh, Happy Day! My seven-year old celebrated her birthday on the first day of second grade...how’s that for having something to celebrate!
When I saw the Glitter Sprinkles, Happy Day die cut accents, I just knew that a birthday layout for Isabella would be full of glam. The party hat die cut pieces were fun to mix and match until I had the combo that worked for me.

The 6x6 paper pad made this page protector layout so, so simple. Just one cut and I’m ready to insert. The candles were made by placing my twine inside my 2.5” wide piece of paper, rolling and then using adhesive to keep the candle in shape.

You might also notice that I trimmed around the birthday cake shape from one of the 24 sheets in the 12x12 Happy Day paper pad.

I went about creating this layout somewhat like a mini album. I love that all of my embellishments have been placed outside the photo sleeves. Pop dots behind the party hat die cut pieces, the fussy cut birthday cake and some of the journaling strips give the layout dimension.

For the holes that were already in the “happy birthday” die cut label, I used my Crop-o-Dile to attach brads that coordinated with the green party hat.
Here’s the finished layout:

Another birthday layout created with the Happy Day collection plays up the huge hot pink circles on my daughter’s dress. I happen to think that stripes and dots are perfect matches and this striped paper has glitter on every row of that gorgeous green color.

I really didn’t need to add anything else, but since she’s a girly girl I did. I began by using my last little scrap of ribbon and used a running stitch. After pulling the floss tightly, I knotted it off and adhered to the page.


In addition to the roughed up circles, I treated one of the layered circles as a button and used my floss to stitch an “x” in the middle. The blue flower in the top right hand corner was made by cutting into my circle punched shape and going ‘round in circles until I got to the middle. I used some glue dots to keep the shape dimensional.

And now for the boys! This box is the perfect size to hold one or two Hot Wheels cars inside.

I trimmed a 12x12 piece of patterned paper to 2” wide, marked and scored my fold lines and adhered the strip to the box. You’ll notice that the paper did not meet.

No worries! Just pull out your box of Glitter Sprinkles and add some ribbon to a tag before placing on the goody box. Ta Da, what gap?
See, I told you it was going to be a Happy Day!
If you like mini albums as much as I do, you might want to visit here again tomorrow!
We’re going to start this Manic Monday with a two home decor projects. I have three kids, two of which are girls, so when I get my pretty papers and adhesive out, they are bound to ask, “Is that going to be for me Mommy?”
Yes, they jumped for joy when I told them that these projects were for them.
Yes, they pouted a bit when I told them that they had to wait until I photographed the projects before they could decorate their rooms. But, I can’t blame them, though, I am not a patient person either.

Shhh, don’t tell him, but that’s hanging on my son’s bedroom door. His room had the best light!
So, I let the girls choose what they wanted their door hangers to say and I really shouldn’t have asked, because they both blurted “KEEP OUT!” at the same time. I went with their requests, but I made it oh, so darling with ribbons, epoxy letter stickers and rhinestones all from the Jocelyn collection.
For the 2 dimensional flowers, I punched 4 flower shapes for each flower {2 flowers are adhered back-to-back for each flower} and then the other flower just had one layer, which I adhered back to back allowing you to see a pattern on both sides of the flower when the petals are bent upward. I used glue dots to secure the layers together.

Now add your rhinestones and circle shapes from the blue raspberry puff alphabet stickers to the middle of the punched flowers.

After adhering your message to the cut patterned paper with blue raspberry puff alphabet stickers, place flowers on the cut patterned paper piece using pop dots for dimension.

After wrapping yellow ribbon around the embellished patterned piece of paper, adhere it to the painted door hanger. By doing so, you can embellish the other side of the door hanger with a different color combination, if you wish.

The project went pretty quickly, even though I made all the flowers and made two hangers. I’m thinking that my 18-year old son will want me to make him a KEEP OUT sign too, just in something other than pink and yellow!
Repurposing objects is a favorite pastime of mine. I found these plaques recently and the chips were easily remedied with a fresh coat of craft paint.

And look at it now after I embellished it with the Happy Day collection.

Simple, simple, simple. After repainting the plaque, I cut patterned paper to size. In each of the four corners, I pierced a hole and added the designer brads from the Happy Day collection. Love those sparkles and so do the girls.

And here’s the plaque in use.

I leave you today hoping that you’re on a hunt...a hunt for things you might have around the house right now that might be perfect to repurpose and redecorate with some lovely patterned papers!